A button with different effects to support the user experience.
In the last JavaFX blog post I showed how a button with an glowing effect can be used to catch the users attention. In this blog post I develop a button based on StackPane to have a normal button in the back and an optional animating image icon in the front.
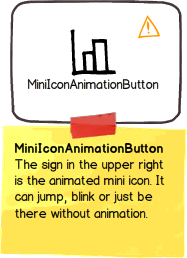
1. UI-Mockup
MiniIconAnimationButton Mockup
2. The code
2.1 Constructor
We need for the button a text, an icon and a mini-icon. As an optional parameter we can set the animation type.
/**
* Extended button without an animation
* @param text button text
* @param graphic button icon
* @param notifyImage mini icon
*/publicMiniIconAnimationButton(Stringtext,Nodegraphic,ImageViewnotifyImage){this(text,graphic,notifyImage,AnimationType.NONE);}/**
* Extended button with an animation
* @param text button text
* @param graphic button icon
* @param notifyImage mini icon
* @param type animation type for mini icon
*/publicMiniIconAnimationButton(Stringtext,Nodegraphic,ImageViewnotifyImage,AnimationTypetype){...}
2.2 AnimationType
There are three animation types for this button.
NONE means that there is no animation. The mini-icon is just shown in the upper right corner.
JUMP means that the mini-icon moves up and down frequently.
BLINK means that the mini-icon changes the opacity from visible to invisible and back.
1
2
3
4
/**
* Type of animation
*/publicenumAnimationType{NONE,JUMP,BLINK};
2.3 add the controls to the stack
The button is an extension of the StackPane to position the button in the back and the mini-icon in the front. The mini-icon is placed on the upper right and 4 pixels away from the edges.
1
2
3
4
5
6
7
8
/**
* add the button to the background and the mini-icon to the front
*/privatevoidstackControls(){StackPane.setAlignment(imageView,Pos.TOP_RIGHT);StackPane.setMargin(imageView,newInsets(4,4,4,4));getChildren().addAll(button,imageView);}
2.4 bind the size of the mini-icon to the button size
The mini-icon should be smaller than the button self. I decided to make the mini-icon a quater of the size of the button. To resize the icon if the button is resized I add an ChangeListener to the binding.
/**
* bind the size of the mini-icon to the button size
*/privatevoidaddImageViewSizeBindings(){finalReadOnlyDoublePropertywidthProperty=button.widthProperty();finalReadOnlyDoublePropertyheightProperty=button.heightProperty();finalDoubleBindingwidthBinding=widthProperty.divide(4.0);finalDoubleBindingheightBinding=heightProperty.divide(4.0);imageView.setFitWidth(widthBinding.doubleValue());imageView.setFitHeight(heightBinding.doubleValue());widthBinding.addListener(newChangeListener(){@Overridepublicvoidchanged(ObservableValueo,ObjectoldVal,ObjectnewVal){imageView.setFitWidth(widthBinding.doubleValue());}});heightBinding.addListener(newChangeListener(){@Overridepublicvoidchanged(ObservableValueo,ObjectoldVal,ObjectnewVal){imageView.setFitHeight(heightBinding.doubleValue());}});}
2.5 add the animation
Based on the type the animation method is choosen.
 1
 2
 3
 4
 5
 6
 7
 8
 9
10
11
12
13
14
15
16
17
18
/**
* add the animation
*/privatevoidaddAnimation(){switch(type){caseBLINK:addBlinkingAnimation();break;caseJUMP:addJumpingAnimation();break;caseNONE:// none is the default case
default:// noting to animate
break;}}
2.5.1 JUMP
The jump is done with a transition. There is a start and an end value and the tranistion calculates the positions for each step.
 1
 2
 3
 4
 5
 6
 7
 8
 9
10
11
12
13
14
/**
* the jump animation changes the position of the mini-icon
*/privatevoidaddJumpingAnimation(){finalTranslateTransitiontranslateTransition=newTranslateTransition(Duration.millis(200),imageView);finaldoublestart=0.0;finaldoubleend=start-4.0;translateTransition.setFromY(start);translateTransition.setToY(end);translateTransition.setCycleCount(-1);translateTransition.setAutoReverse(true);translateTransition.setInterpolator(Interpolator.EASE_BOTH);translateTransition.play();}
2.5.2 BLINK
The blinking is done by changing the opacity of the mini-icon. This is done with a Timeline and a KeyFrame. The timeline changes the given property from the value at the beginnign to a new value and back.
 1
 2
 3
 4
 5
 6
 7
 8
 9
10
11
12
/**
* blinking animation changes the opacity of the mini-icon
*/privatevoidaddBlinkingAnimation(){finalTimelinetimeline=newTimeline();timeline.setCycleCount(Timeline.INDEFINITE);timeline.setAutoReverse(true);finalKeyValuekv=newKeyValue(imageView.opacityProperty(),0.0);finalKeyFramekf=newKeyFrame(Duration.millis(700),kv);timeline.getKeyFrames().add(kf);timeline.play();}
2.6 button delegation methods
The rest of the button code is simple delegation code which calls the button methods on the original button.
 1
 2
 3
 4
 5
 6
 7
 8
 9
10
11
12
13
14
15
16
17
//////////////////////////////////////////////////////////////////////////////////////////////////////////////////////
// delegation methods for button, this class should behave like a normal button //
//////////////////////////////////////////////////////////////////////////////////////////////////////////////////////
publicvoidsetDefaultButton(booleanvalue){button.setDefaultButton(value);}publicvoidsetFont(Fontvalue){button.setFont(value);}publicObjectProperty<ContentDisplay>contentDisplayProperty(){returnbutton.contentDisplayProperty();}// ...